

Learn how you can use your planner to lighten your home health workload. I’ve written about how you can take control of your sessions to save time while benefiting your patients. I’ve also written about how organizing your work bag can save you time. Today, I’m continuing the discussion by sharing how I’m using my weekly planner to save time and minimize mistakes.
Here’s an outline of this post:
- How your planner can save you time.
- My planner gives me plenty of space.
- Put useful information in the front (and easily carry over year-to-year).
- Make a pocket to hold HIPAA-sensitive information.
- Take control of your schedule by planning.
- How I use my planner to work smarter and faster.
- Tear out old pages to minimize risk of a HIPAA violation.
- Try a new strategy next week.
How your planner can save you time
We’re all familiar with teaching our patients or clients how to use calendars and planners to accomplish their goals. But have you considered using similar tools and strategies to achieve a lighter workload?
Do you have any of these problems?
- Finding yourself zigzagging across your territory every day.
- Searching for the same information again and again.
- Forgetting to bring things to your sessions.
- Asking your supervisor the same questions every time an uncommon situation comes up.
- Repeating the same mistakes.
- Spending time looking up what you did with your patient last week in order to prepare for this week.
- Forgetting to do parts of your documentation.
If you answered yes, then you’ve just identified a pain point that is costing you time and causing you frustration. The next step is to make a change to solve that problem.
How I solved these problems
I’ve found that taking a little time to plan and organize has made me faster, more accurate, and less likely to forget to do necessary tasks. I’m not the most organized person (just ask my husband!), but if I can improve to the point where it’s making a significant difference, then you can too.
Of course, I’m not perfect. I still forget things. My days can fall apart and turn crazy (like yesterday when I had to cancel two routine visits and ended up with three new evaluations and one re-assessment). Home health is still a challenging work setting, but I feel much more in charge of my own life, and I have much more time to do the things that I really want.
Use your weekly planner to lighten your workload
- Plot your ideal schedule for next week before you start scheduling patients.
- Remind yourself to bring things.
- Keep track of productivity.
- Write down therapy ideas as they occur to you.
- Keep track of paperwork, phone calls, and other to-dos.
- Quickly locate useful information on the fly.
I prefer to use a planner I can write in, but most of these strategies could be applied to online calendars or to-do apps. Just be mindful of protecting your patients’ privacy, of course.
My planner gives me plenty of space

I’ve been using this style 8¼” x 11″ weekly planner* for years. It gives me plenty of space to keep track of everything I need on a day-to-day basis.
*This is an Amazon affiliate link. As an Amazon associate, I may earn a small commission on qualifying purchases. There is no extra charge to you, and it will help keep Eat, Speak, & Think sustainable.
Put useful information in the front (and easily carry over year-to-year)
At the end of my first year, I noticed I had lots of notes jotted in the front and back of my book with various types of information including:
- My companies offices, addresses, phone and fax numbers.
- Supervisor names.
- Mail code.
- ENT and GI names, addresses, phone and fax numbers.
- Supervisors and meal schedules in assisted living facilities.
- Names of other SLPs in nearby facilities.
- Standing meeting times and call-in information.
- Who is before and after me for the emergency phone tree.
- Contact info for my local reps for AAC vendors and thickener companies.
- NOMNOC phone numbers for various insurances.
- Time units for drive time (example, 25 minutes is 0.42 hour).
I find that I refer to some of this information frequently. For me, it’s often faster and easier to refer to my book rather than looking up the information, especially if I’m talking on the phone.
I didn’t want to write this information in my book each year, so I typed it up. I add notes and update the information during the year. In December, I update the document and print it out for my next book. I simply trim the edges and then tape the pages into the front of my weekly planner.
A painless way to get started
- Start a table in Word or Google Docs.
- Add information you already know.
- Print it out, trim the edges, and tape inside the front or back of your planner.
- During the year, write in any new information.
- At the end of the year, add that information to your document before printing it out for your new planner.
Make a pocket to hold HIPAA-sensitive information
The time-wasting problem
One major problem I experienced was needing patient-related information quickly when my laptop was turned off. For instance:
- I could use a small window of time to call a doctor, if I just had the patient’s information in hand.
- A doctor’s office calls me during a session, and I have just enough time to call back but I know the receptionist will want the date of birth.
- A patient calls last minute to reschedule, and I know I could probably switch two patients without throwing my schedule out of whack if I could just make phone calls right away.
I don’t know about you but it takes a good five to six minutes for me to get into my electronic medical record (EMR). It was very frustrating to waste that time. My company pushes us to limit possible exposure of protected information, so I don’t want to just write it in my planner and have it sitting there all year.
I wanted an easy way to access a patient’s information. I also wanted to protect the information, and get rid of it when I discharge the patient.
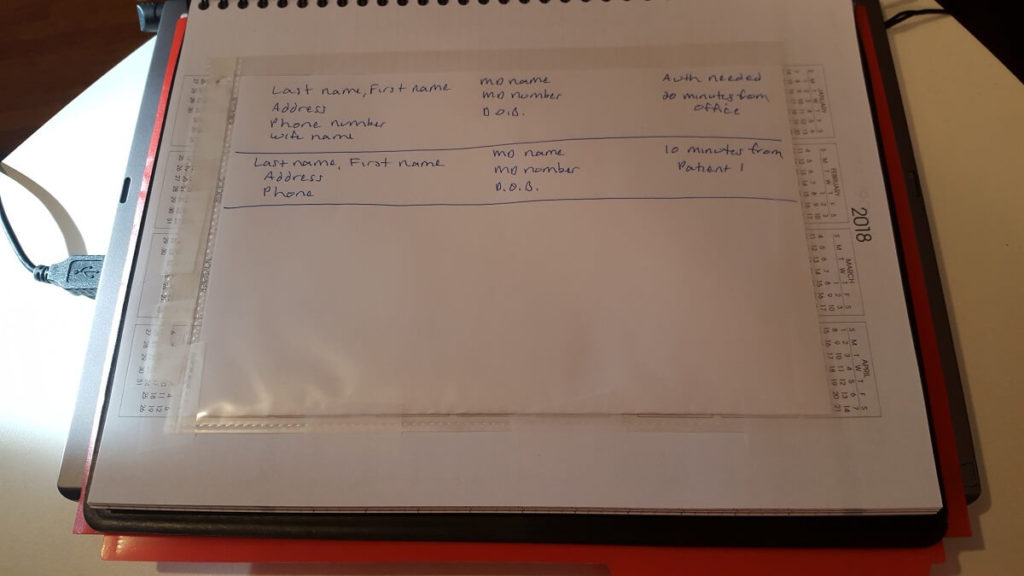
The time-saving solution
My solution was to create a pocket in my schedule book by cutting a page protector in half and taping it inside my schedule, on one of the opening pages. I keep a single piece of paper in there (folded in half), with the information for my current caseload that I might need to access quickly:
- Name, address, phone number(s), date of birth, and caregiver names.
- Doctor’s name and number
- Travel time to office and other patients who are very close or very far to assist with strategic scheduling.
- Insurance authorization information.
Once I’ve discharged a few patients, I copy the current information (often just last name, dob, and doctor name since I already know the patient by then) and shred the old sheet.
I can’t tell you how many times each week I use this paper to take advantage of a short time window to make phone calls.
Take control of your schedule by planning
The first step is to plan your ideal week for next week. Don’t let your patients control your schedule by scheduling them on a first-come, first-served basis. If you take some time to pre-plan your ideal week, you’ll gain some control and hopefully save yourself some time and decrease your stress.
I’ve previously written about how to schedule strategically, and you can find more details in that post. The basic ideas are:
- First, block out important personal time such as exercise or appointments.
- Next, pencil in when you hope to see people. Group people who live near each other. Take their schedules and preferences into account.
- Finally, confirm appointments for next week as you see people this week.
If you stay aware of your patient’s medical appointments and personal preferences, you’ll likely have good success in scheduling your patients in a reasonably efficient way.
I also try to over-book early in the week, so that I’m not scrambling to meet productivity if I have a cancellation. If I don’t have a cancellation, I’ll either have a lighter Thursday, or I can take an extra visit for extra pay.
How I use my planner to work smarter and faster
I write my plan in pencil, and then write in pen after the fact. I pencil in last names, but for privacy here I used anonymous labels.
My planner: Monday through Wednesday
Here’s Monday through Wednesday of an actual week in late October 2018. I’ve marked it up as if we were looking at it on Wednesday afternoon, before going out to see patients on Thursday.
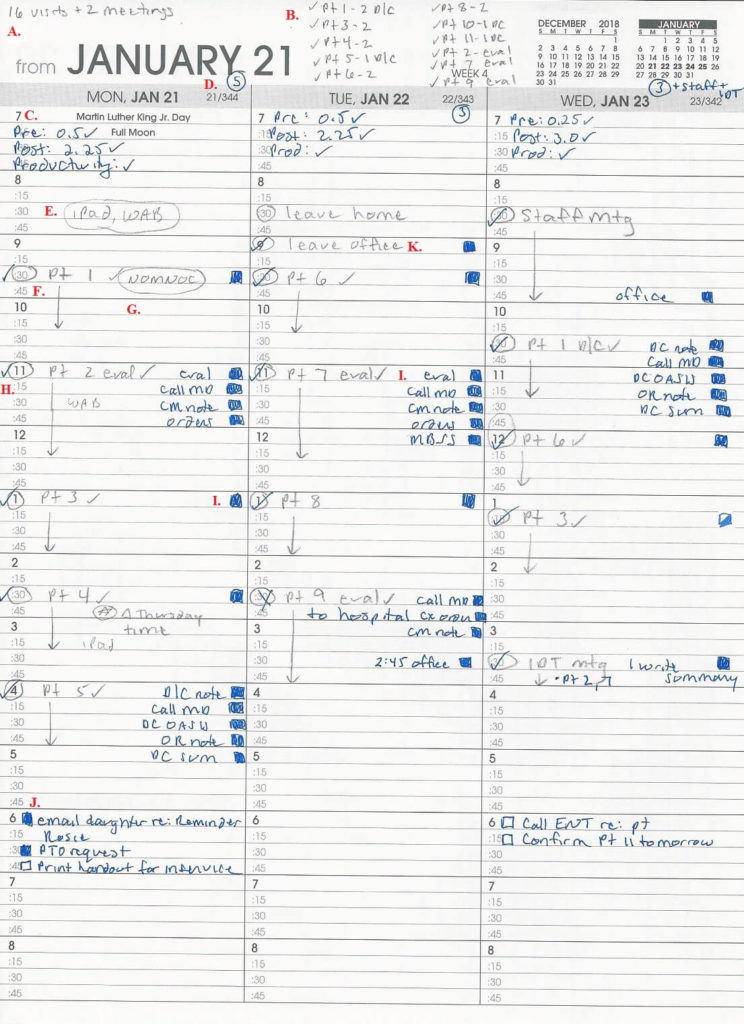
Detailed explanation
A. I write my total planned visits and meetings in the top left corner. This helps me to plan enough visits to meet productivity.
B. I make a list of patients and planned visit counts along the top, noting evaluations and discharges. If I have a patient on caseload who doesn’t have a visit during this week, I write the name up top with a “0” so I don’t lose track.
C. At the top of each day’s column, I list my “pre-time” and “post-time” and check each off when I’ve entered it into the EMR. I also list “productivity” and check it off when I’ve emailed my supervisor.
D. At the end of the day, I note how many visits I made as well as any other activities that count towards productivity.
E. In the space before my first appointments, I pencil in materials that I need to bring with me (that I don’t normally carry in my rolling work bag).
F. Although I only plan on being in the home for 45 minutes, I schedule routine visits for an hour. I use the remaining 15 minutes to (hopefully) complete the visit note. I usually set aside 90 minutes for new evaluations.
G. I add notes to make sure I don’t forgot things like to administer the NOMNC (Notice of Medicare Non-Coverage). I’ll also jot down materials that I don’t usually carry.
H. I switch to pen once I see the patient. I check off visits that happen, and cross off visits that don’t (such as my Tuesday, 3:30 visit). This makes it easy to keep track for productivity.
I. I draw in boxes to keep track of my documentation to-do’s for each visit type, the necessary phone calls, insurance authorizations, and the steps for instrumental swallow studies and the AAC process.
- An empty box means I haven’t done any work outside of the session.
- A partially filled box (such as my 1:15 on Wednesday) means that the step is started but not complete.
- The filled boxes mean the step is complete.
J. I use the space at the bottom of the page to keep track of any other to-do’s, such as scheduling new evaluations, making copies at the office, returning phone calls, etc.
K. I plan when I’ll go to the office. When I do go to the office, I draw a box to remind me to enter it into my EMR so I get paid for mileage.
My planner: Thursday through Sunday
Now here’s the rest of the week, before leaving home on Thursday.
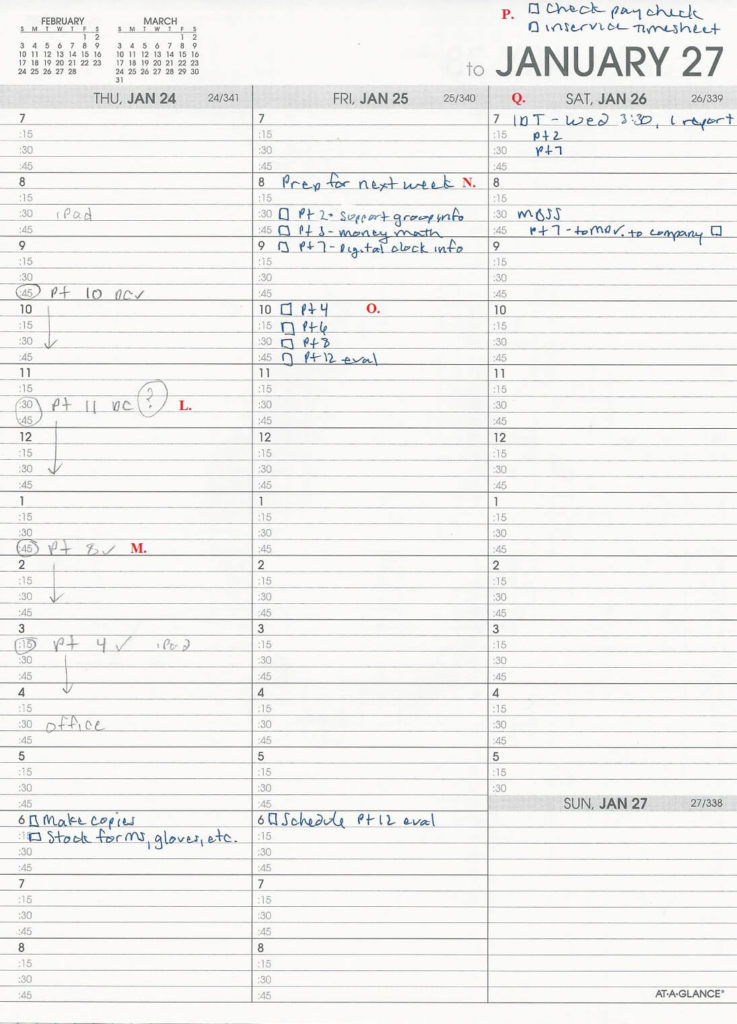
Detailed explanation
L. I put a question mark after unconfirmed planned visits.
M. Once the visit is confirmed, I replace it with a check mark.
N. I keep track of preparing for next week. As I get ideas for therapy during the week, I jot them down in Friday’s column (I usually work Monday through Thursday).
O. At the end of the week, I add any patients not already listed in my “prep” list. I sit down and plan the next week’s therapy all at once. Some weeks, it takes 20 minutes and other weeks it can take an hour or more.
P. I check my paycheck each week to make sure any extra pay has been paid. I also keep track of putting in any extra paperwork for getting paid, such as going out of territory, making extra visits, or mileage to a location to give a presentation.
Q. I use this last column for notes and additional to-do space.
Tear out old pages to minimize risk of a HIPAA violation.
I pull out previous pages of my schedule and shred them, keeping only the previous week. Not only am I helping to protect patient privacy, my book gets lighter as the year goes on. It’s a win-win!
Try a new strategy next week
If you’ve identified a pain point, try applying your executive function skills to your own situation.
- Set a goal.
- Make a plan.
- Do it.
- Review.
First, identify something specific that you want to change for yourself. Make it a SMART goal!
Next, make a plan for how you can achieve that. Maybe something I’ve shown looks useful, or you can find plenty of other systems online.
Then actually do it. Change can be uncomfortable, even if you want better results. If you’re resisting trying something out even though you want to, tell someone what you plan to do. That way you’ll feel accountable and will be more likely to do it.
Finally, after trying it out, take a moment and decide whether the strategy saved you any time or decreased your aggravation. Is there anything that could have gone better? What could you change for next week?
Good luck! Please share this with your over-worked friends and colleagues. And please share any time-saving ideas that you have in the comments below!
Featured image by Anete Lūsiņa on Unsplash.

Lisa earned her M.A. in Speech-Language Pathology from the University of Maryland, College Park and her M.A. in Linguistics from the University of California, San Diego.
She participated in research studies with the National Institute on Deafness and other Communication Disorders (NIDCD) and the University of Maryland in the areas of aphasia, Parkinson’s Disease, epilepsy, and fluency disorders.
Lisa has been working as a medical speech-language pathologist since 2008. She has a strong passion for evidence-based assessment and therapy, having earned five ASHA Awards for Professional Participation in Continuing Education.
She launched EatSpeakThink.com in June 2018 to help other clinicians be more successful working in home health, as well as to provide strategies and resources to people living with problems eating, speaking, or thinking.
Be First to Comment